


ENTERPRISE
Configuring database details
-
Last updated: July 3, 2023
-
Read time: 2 Minutes
For Kubernetes deployments of Burp Suite Enterprise Edition, database configuration is handled in the application itself as part of the initial configuration flow. This is a change from legacy cloud deployments, in which these details were configured as part of the install process.
Note
Make sure that you have stopped your old deployment and created a snapshot of your database before proceeding.
Connecting to your database
The next step in the process is to give Burp Suite Enterprise Edition the details of your new database instance.
Note
Before you attempt to connect to your database, please make sure that you have configured it to work with Burp Suite Enterprise Edition. For details of how to do this, see Setting up the external database.
To configure database details:
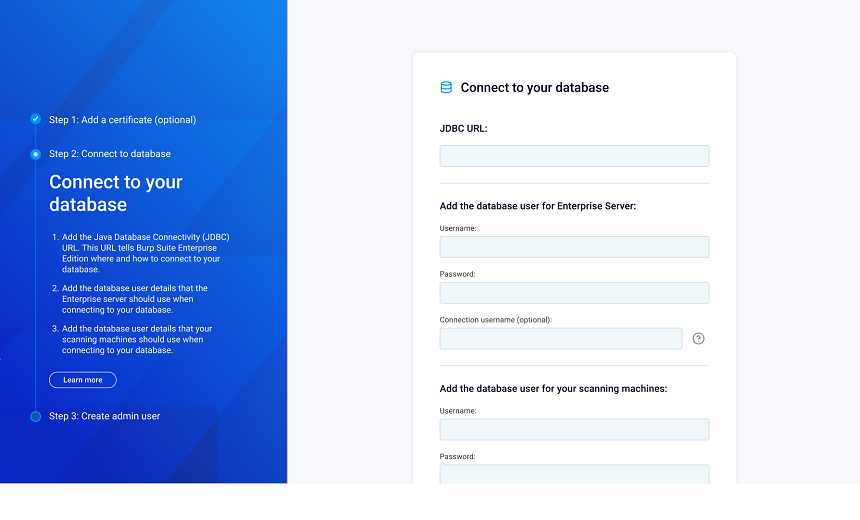
- From the Burp Suite Enterprise Edition configuration flow, either complete or skip the Upload a TLS certificate page to display the Connect to your database page. For more information on running the configuration flow and uploading TLS certificates, see Configuring Transport Layer Security.
- Enter the database's JDBC URL. Note that the URL format needed changes depending on the type of database you want to use. For more information on JDBC URLs in Burp Suite Enterprise Edition, see Database connection URL format.
- Enter the Username and Password of the Enterprise Server database user. This is the user that the Enterprise Server will use when connecting to the database.
- Optionally, add a Connection username for the Enterprise Server database user. This property is used if your database requires a separate username format (such as user-name@server-name, for example) when connecting externally.
- Enter the Username and Password of the Enterprise scanning machine database user. This is the user that Enterprise scanning machines will use when connecting to the database.
- Optionally, add a Connection username for the Enterprise scanning machine database user. This property is used if your database requires a separate username format (such as user-name@server-name, for example) when connecting externally.
- Click Next to save your database details.
Note
You don't need to create an admin user when migrating from a legacy cloud deployment. Admin details are already in the database from the previous installation.
Next step - Activate your license