


PROFESSIONALCOMMUNITY
Reducing noise during manual testing
-
Last updated: July 6, 2023
-
Read time: 3 Minutes
When proxying traffic through Burp for the first time, you may be surprised by the sheer number of requests that take place as you browse. Burp provides a variety of features to help you reduce as much noise as possible. This allows you to focus your time and effort where it matters and makes it much easier to analyze the target website's behavior.
In this tutorial, you'll learn how to:
- Configure a basic target scope.
- Prevent out-of-scope traffic from being logged across Burp's tools.
- Apply filters so that you can focus on specific items you're interested in.
Setting a basic target scope
Setting the target scope should be one of the first things you do no matter what you're testing. Not only does this help you get the most out of Burp, it may prevent you from sending potentially harmful requests to hosts that you don't have permission to test.
Step 1: Use Burp's browser
Go to the Proxy > Intercept tab and launch the Burp's browser. Use it to open the following lab:
https://portswigger.net/web-security/os-command-injection/lab-simpleStep 2: Create a target scope from the site map
After the lab loads, go to the Proxy > HTTP history tab. In addition to the requests to the lab's deliberately vulnerable shopping website, you'll see requests to portswigger.net and a variety of other hosts related to third-party services and browser functions.
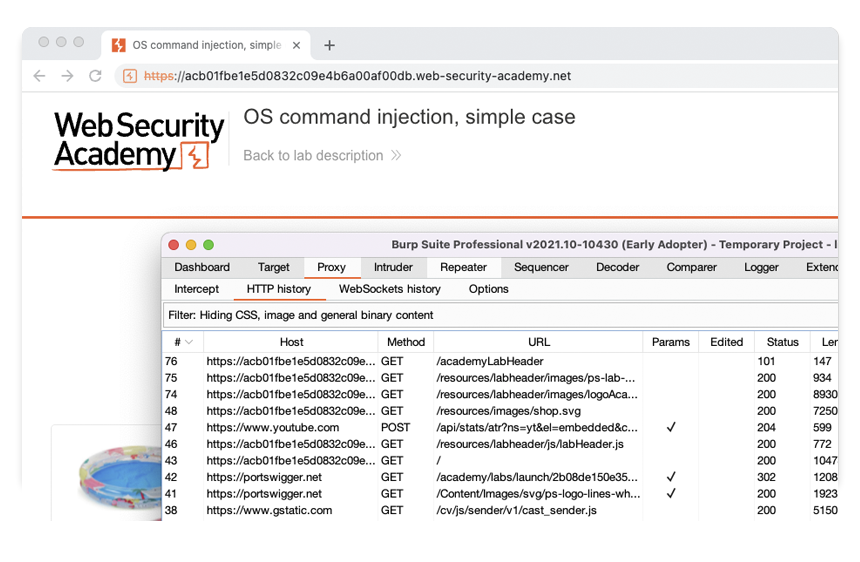
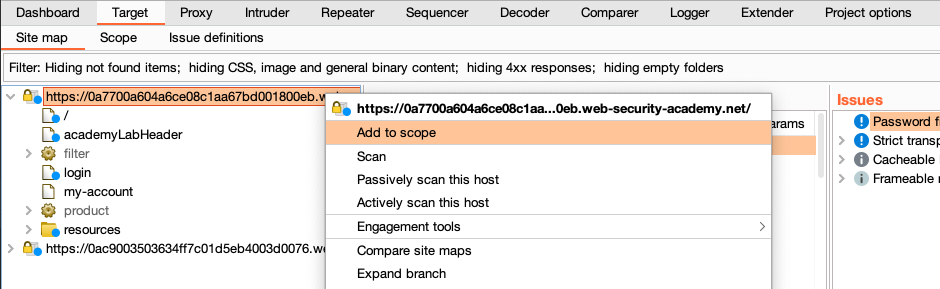
Go to the Target > Site map tab and notice that there are also entries for each of these hosts in your project's site map.
Right-click on the entry for https://<YOUR-LAB-ID>.web-security-academy.net and select Add to scope.
Step 3: Disable logging of out-of-scope traffic
Burp now recognizes that you have defined a scope for the project and asks whether you want to stop logging data for out-of-scope items. Click Yes.
Any new requests that the browser makes will now only appear in Burp if they are sent to <YOUR-LAB-ID>.web-security-academy.net.
Note
You can re-enable logging of out-of-scope traffic at any time by clicking the button at the top of the Proxy sub-tabs.
Step 4: Refine the scope
Go to the Target > Scope tab and observe that the lab URL has been added to the list of included URLs.
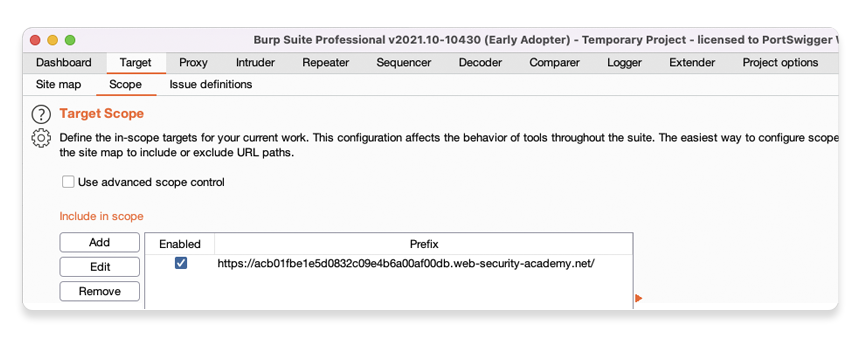
By default, all paths or endpoints of this host are considered in-scope. To exclude specific subpaths, you can either:
- Add a URL to the Exclude from scope list using the provided buttons.
- Right-click on the relevant node in the site map and select Remove from scope. Note that you can also do this by right-clicking on individual requests in the proxy history, for example.
There are some more advanced options for configuring a scope using regular expressions, but we'll cover these in a separate tutorial.
Using filters
Throughout Burp's tools, there are a variety of filter settings that allow you to temporarily hide data that isn't relevant to your current task.
Step 1: View the proxy history
Go to the Proxy > HTTP history tab. Although Burp isn't logging any more out-of-scope traffic, the history still shows a number of requests that were logged before we set a scope.
Step 2: Open the filter settings
Just above the list of requests, notice the Filter bar. This displays a summary of which filters are currently active.
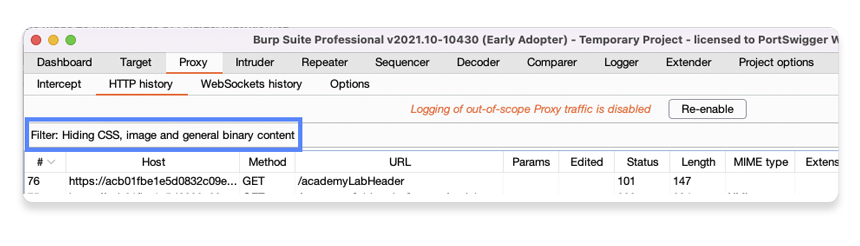
Note that some filters are enabled by default, so this may already contain a few entries. Click this bar to open the filter settings.
Step 3: Apply a filter to hide out-of-scope items
Notice that you have a range of options for filtering based on MIME types, response status codes, specific search terms, and so on. You'll find similar filter bars with different options in some of Burp's other tools.
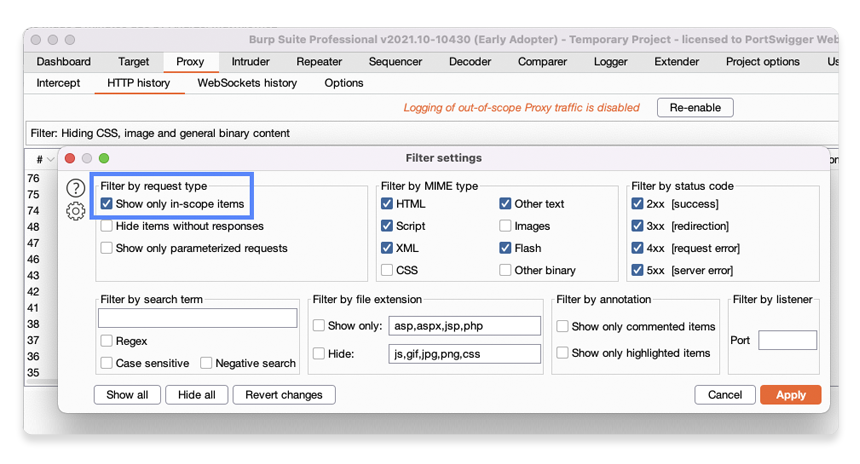
In the upper-left corner of the Filter settings dialog, select the Show only in-scope items option and click Apply.
Observe that all of the requests to other hosts have now disappeared from the proxy history, allowing you to focus on requests that are related to the lab.
Now you know how to configure a basic target scope and apply filters in Burp. These simple skills are essential for testing live sites and make it much easier to complete the labs on the Web Security Academy.