


PROFESSIONAL
Working with GraphQL in Burp Suite
-
Last updated: July 6, 2023
-
Read time: 4 Minutes
GraphQL is an API query language that is designed to facilitate efficient communication between clients and servers. It enables the user to specify exactly what data they want in the response, helping to avoid the large response objects and multiple calls that can sometimes be seen with REST APIs.
GraphQL services are commonly used in authentication and data retrieval mechanisms. This means that if an attacker can successfully send malicious requests, they may be able to access vulnerable information or even execute higher-severity exploits such as cross-site request forgery (CSRF).
Burp Suite's InQL extension makes it easy to construct GraphQL requests and learn more about an API's schema.
For a full primer on what GraphQL is and how it works, see Web Security Academy: What is GraphQL?.
Before you start
To set up InQL with Burp Suite:
- Install Jython. Jython is a version of Python that runs on Java, and is necessary to run Python-based extensions in Burp Suite. You can download it from the Jython site.
- Install the InQL extension. For more information, see Installing extensions.
Viewing and modifying GraphQL requests
If InQL detects a GraphQL request, it automatically adds an InQL tab to the message editor for that request. The InQL tab provides an efficient way to modify GraphQL queries and their variable dictionaries. Once InQL is installed, the tab appears for any request that has a valid JSON object as its body.
The InQL tab enables you to view queries and variable dictionaries independently of the rest of a request. The query structure is displayed as a JSON object in the Query panel, and its associated variables in the Variables panel underneath.
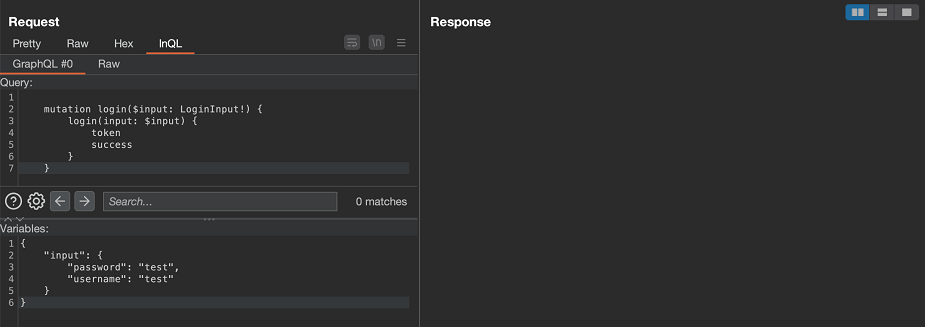
In editable contexts (such as when viewing a request in Repeater) you can edit GraphQL queries directly in the InQL tab.
Converting GraphQL request format
InQL can send GraphQL requests to Repeater using different request methods and body encodings. This is useful in circumstances where you need to send requests in a different format to "standard" JSON POST (for example, if introspection is disabled on the POST method but not on the GET method).
To convert request formats in InQL, right-click on an unconverted GraphQL request and select Extensions > InQL - Introspection GraphQL Scanner > [select option]. The following options are available:
- Send to Repeater - Sends the request to Repeater without making any changes to it.
- Send to Repeater (GET - Query params) - Sends the request to Repeater as a GET request. The request body is converted to query parameters within the URL string itself.
- Send to Repeater (POST - Body URLencoded) - Sends the request to Repeater as a POST request with a
Content-Typeofapplication/x-www-form-urlencoded. The request body is converted to URL encoding. - Send to Repeater (POST - Body Form-data) - Sends the request to Repeater as a POST request with a
Content-Typeofmultipart/form-data. The request body is converted to form data.
If you select one of these options from within Repeater, Burp opens a new Repeater tab with the request in the specified format.
Note that you cannot use InQL to convert a request that has already been converted.
Scanning an API schema
InQL Scanner enables you to gain information about a GraphQL endpoint's schema. It uses GraphQL's built-in introspection feature to list all queries and mutations supported by the API. This information is extremely useful when planning how to attack an API.
To run a scan with InQL:
- From Burp, select the InQL Scanner tab.
-
Enter the location of the schema into the address bar. You can do this in two ways:
- Enter the URL of the GraphQL endpoint.
- Enter the location of a JSON file containing the results of an introspection query against the endpoint. You can either specify this as a location on disk (e.g.
/tmp/schema.json) or click Load and browse to the file.
- Press Enter to run the scan. InQL adds the endpoint to the list of scanned endpoints on the tab.
To view queries or mutations once you have run an InQL scan:
- Double-click the relevant endpoint in the tree menu to expand it.
- Expand either the query or mutation list, as required. InQL displays a list of dates on which that endpoint was scanned.
- Select the date on which the scan was run. InQL displays a list of timestamps at which that endpoint was scanned.
- Select the timestamp of the scan you want to view. InQL displays a list of queries or mutations (as applicable) that were discovered in that scan.
- Select a query or mutation to view its structure.
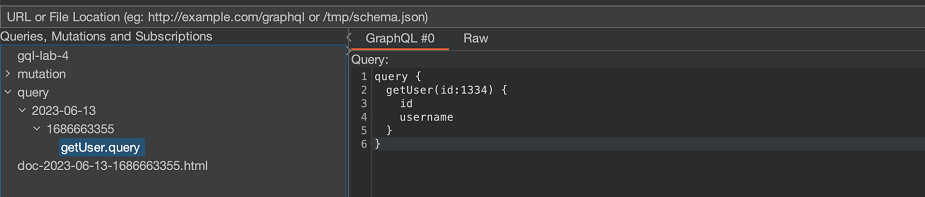
In the example above, the scan has found one available query: a getUser query that takes a user ID and returns the associated ID and username.